1 - Printing file from Desktop (Optional)Open the document you would like to print.  2 - Press on Command + PAfter you open the document you would like to print, select the printer "KMFollowMeSecure_AD" from the drop down menu.  3 - Optimise printing settings and send to printer.Before you send the document to the printer, optimise the printing settings according to your needs or preferences. 1 - Select the pages you want to print from the document or leave it on "All" (Default) if you want the whole document to be printed. 2 - Select how many copies you want to print. 3 - Select whether you want the document to be printed only in black and white or colour. (Black and white: 3 cents per page, Coloured: 17 cents per page) 4 - Select the size of paper you want your document to be printed on. In most cases, it will be A4 unless you want to print a poster or something that is bigger than an A4 paper. 5 - Select whether you want the document to be printed double sided or not. (Printing double sided saves you money and reduces paper usage) 7- Click on print to send the document to the printer. 4 - Click on PrintAfter the changing the printer destination, click on the print button.  5 - Find a Printer near youThese are the following printers available to student use in the campus: 1 - A-wing (Next to staff room ) 2 - B-wing (Library) 3 - I-wing (In-front of EAL room) 6 - Log in to your printer account using your printer card or codeUse your printer account or 5-digit code to log in to your account. Follow the pictures below to see how to log in wither with the card or code.  If you are using your printer card to log in, place the card beneath the screen as shown in the image above.  If you are willing to use your code to log in, press on the button pointed to in the image and a screen will appear. 7 - Press on the log in button After you scan your card or enter the code, press on log in.  Ignore this screen and press on "Ok" to move forward. 8 - Press the menu buttonAfter you have logged in to your account, press the menu button to view the next step. 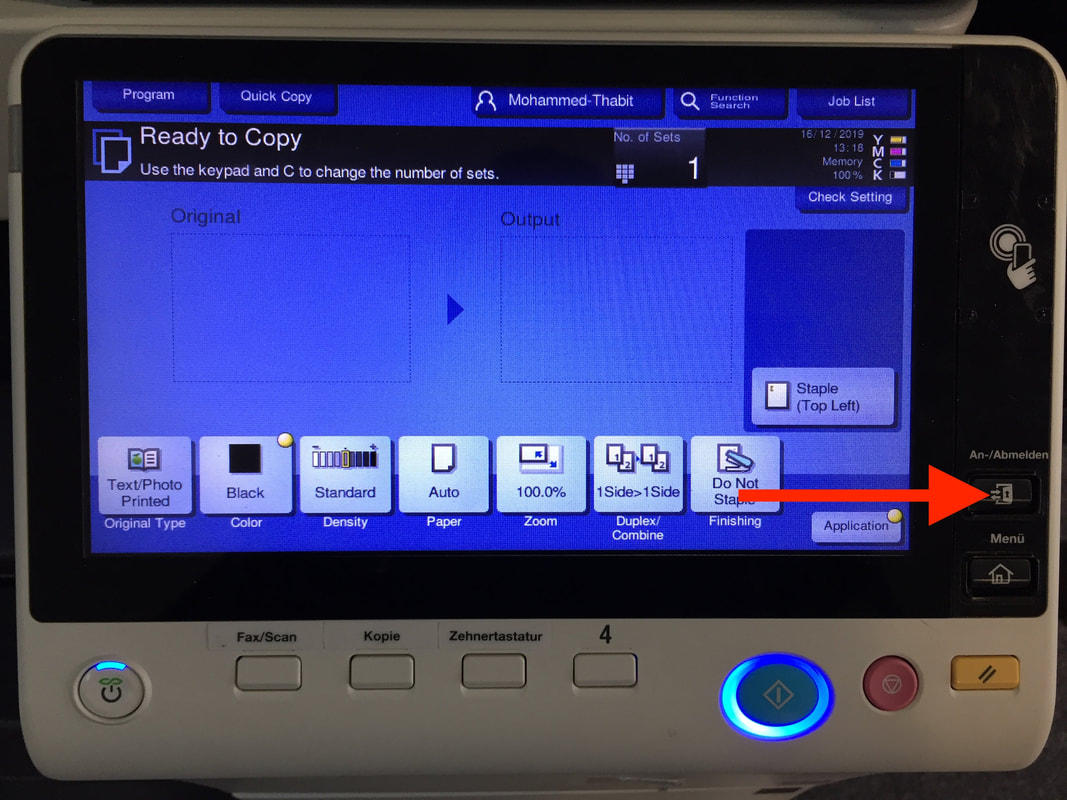 9 - Press on the "App" button on the screenAfter you have pressed on the menu button, press on the "App" option on the screen.  10 - Press on the "Pcounter Print" buttonAfter you have pressed on the App button, select the "Pcounter Print" option to view your print jobs.  11 - Select the documents you would like to print from the print jobs you haveAfter you press of "Pcounter Print", select the job prints you would like to print.  12 - Press on the blue button to print the selected print jobs.Press on the blue button under the screen to print the document(s).  13 - Click Close and EnjoyAfter the printer starts printing, the following message will appear. Simply press on "Close" and collect your documents.  14 - Press on the "Log out" button on the side of the screenAfter you print the document(s), you can select "Abmelden" to log out instantly. Alternatively the printer will log out of your account automatically after a short period of time. 
0 Comments
|
AuthorCommunity of ISHR Students here to assist you with any tech related problems ArchivesCategories |
 RSS Feed
